In this tutorial we will be exploring the Websploit Wifi Jammer module which we’ve edited to work with the latest version of Kali Linux. The Websploit Wifi Jammer module is a great tool to automatically disconnect every client connected to the targeted wireless network and access point. The WiFi Jammer module also prevents new and disconnected clients from connecting to the WiFi network. The module has been edited to work with Kali 2.0 and the new monitoring interface names (wlan0mon, wlan1mon etc.). For your convenience we’ve also set wlan0mon as the default interface. The edited Websploit Wifi Jammer module script can be downloaded using the following link:
wifi_jammer.py (545470 downloads )
In order to work with the new script in Websploit you have to replace the script in the following directory in Kali Linux with the downloaded script:
/usr/share/websploit/modules/wifi_jammer.py
Websploit WiFi Jammer Tutorial
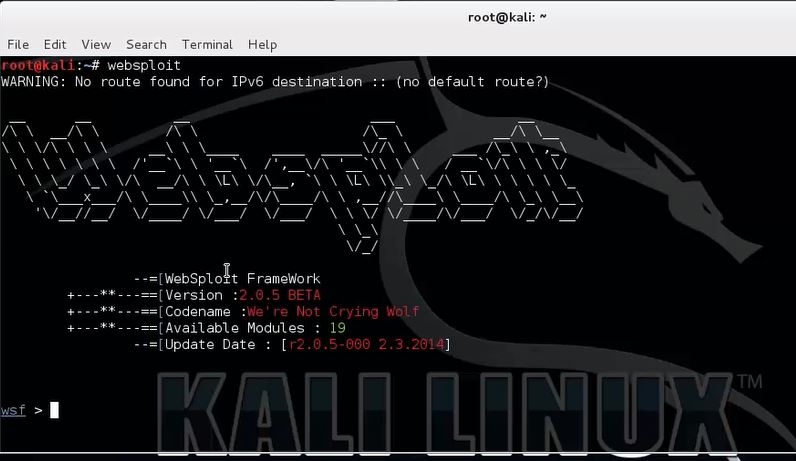
Open a new terminal and start websploit with the following command:
websploit
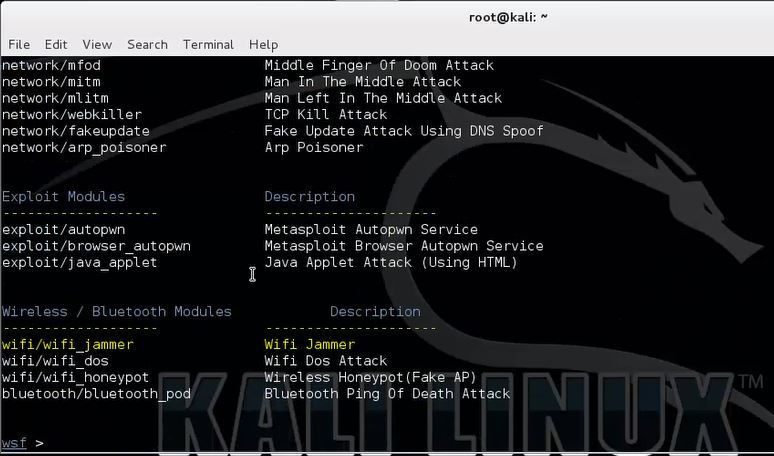
Use the following command to show an overview of available modules from which we will select the Websploit WiFi Jammer module:
show modules

Use the following command to set the wifi/wifi_jammer module from the Wireless / Bluetooth modules section so we can configure the necessary parameters:
use wifi/wifi_jammer
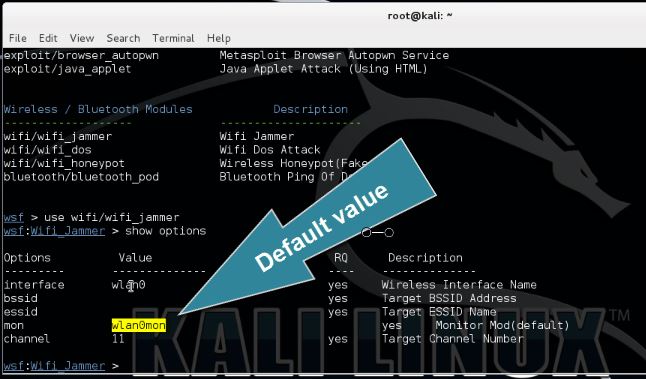
Type the following command to show the available options for the Websploit WiFi Jammer module:
show options
We need to specify the target’s BSSID, ESSID and the channel on which the access point is broadcasting. Also change the wireless interface and monitoring interface if needed. The default values for these parameters have been set to wlan0 and wlan0mon according the new naming format.
To determine the target’s BSSID, ESSID and channel you can use a tool like aircrack-ng or similar. It is beyond the scope of this tutorial to explain this process in detail. The following tutorials teach you how to use Airodump-ng which provide you with the necessary details (or watch the video tutorial at the bottom of this post):
How to hack a TP link WR841N router wireless network
How to hack UPC wireless networks and other WLAN pt 1
Use the following set command in Websploit to set the parameters:
set BSSID [BSSID]
set ESSID [ESSID]
set channel [channel number]
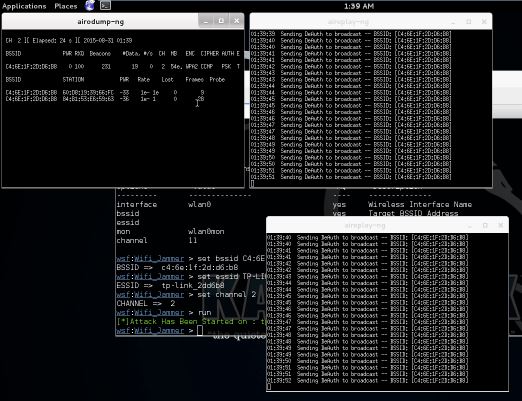
Now type run to start the WiFi Jammer module on the specified target:
run


The Websploit WiFi Jammer module uses airodump-ng to determine connected clients and aireplay-ng to spam deauth messages to those connected clients. As you can see on the last screenshot we are disconnected on a Windows host and unable to connect again. This will remain this way until we stop the WiFi Jammer and close the aireplay-ng windows.
We’ve mentioned ‘connected clients’ a couple times throughout this tutorial. Note that a connected client can be anything from a regular desktop PC to WiFi Security cameras, home automation systems and any other system using WiFi for data transmission and operation. This is one of the many reasons why you should not us critical devices on wireless networks but use wired networks instead.
WiFi Jammer Video Tutorial
Thanks for watching and please subscribe to our YouTube channel for more hacking tutorials :)
 If you’re interested in learning more about web penetration testing you can follow any of these online courses:
Online Hacking Courses
Web Penetration Tester
You will learn hacking tools, methodologies and techniques. This is a both practical and theoretical step-by-step course. Read more…

How to be an Independent security researcher
If you are a web developer, Bug Hunter or any it security researcher then this course will be very help full.
Read more…


15 Comments
very useful tool ! there’s a wifi in my university and when like 20 person connect , you can”t connect
so I need to deauth all users and connect I tried that but they reconnect quickly and I rarely get the chance to :/
so what to do ? and can I deauth a 3 or 4 users at once ? thanks ^^
Hi! Yes, you can deauth 3 or 4 users manually with aireplay-ng after you got their MAC addresses with airodump-ng or another tool.
I use the command ” aireplay-ng -0 1000 -a (bssid) -c (one target) mon0
how can I target more users at this bssid ?
If you want to target multiple specified users with death messages, you should write a script for it. Aireplay-ng does not support multiple user death at the moment.
I found a script but I don’t even know how to use that :3 thx anyway
Post the script, maybe I can help you :)
that’s the source if u can make a small tuto on how to make the targetlist.txt that’ll be good :D thx
http://blog.techorganic.com/2010/12/20/capturing-the-wpa-handshake-using-mass-deauthentication/
Hi, I tried what you said but whenever I try changing my interface and/or monitor it will not accept any name above 5 characters. Is there a way for me to fix that?
Hi,
I fixed the Websploit Module script for this purpose, it is available for download. See the first paragraph of the tutorial for the download link and instruction on how to install it.
Best regards,
Hacking Tutorials
Yes I noticed that and by using your script it works fine but if I wish to change the name again it will not go above 5 characters! So long as I am using your script though it works fine. Also, all of a sudden when I try running the jammer 3 command prompts pop up saying
“can’t execvp aireplay-ng:no such file or directory”
“can’t execvp airodump-ng:no such file or directory” (Displays two times)
hey i need ur help bro
i am new to kali linux
i am not Able to activate my wifi settings in kali linux live mode on my system will u plz help this..
Hi! I have a major problem: When I do airodump-ng –bssid (my bssid I’m using) wlan0mon, I get this:
n180211 not found.
Interface wlan0mon:
ioctl (SIOCGIFINDEX) failed: No such device.
Any suggestions? I can’t find much.
Sorry if this is a ridiculous question, but thank you for helping.
Hello. Is this working on 5Ghz band?
Hey when i write airodump-ng –bssid [target ] mon and press enter it shows me no device why is that ????. and why its not showing me wlan0mon ??? please do reply :)
Hi, did you put your card in monitoring mode?